Visma.net Approval
What's new
A new user interface aiming to simplify your experience when working with tasks in Visma.net Approval
The new user interface improves the process for users to efficiently approve or reject tasks. The features included in the user interface are unchanged compared to the old user interface, but the way they are presented has changed.
How to use it?
Login to Visma.net Approval, go to My tasks and open a task.
Main actions as Approve, Reject, and Other have been moved at the top right, together with the Task navigation arrows. They have the same functionality as before.
All the tabs (Task details, Document editor) and the headlines (Comment & data and Workflow) from the old view are now displayed in one screen, in their own modules with icons and tool tips with their names.
The new layout has been added also in My history, Process overview and Document overview.
Some of the modules have new names:
-
Process details is renamed to Document details
-
Comments & data is renamed to Notes and comments
-
Document Preview is renamed to Document
You can hide the modules by clicking the corresponding icon on the sidebar. When you hide a module, the icon will be highlighted in blue. The layout will be saved, allowing you to keep the same modules in view, when clicking the arrows on the top right and navigating to the next task.
Workflow Details Module
In this module is displayed the graph with the workflow configuration steps. When you hover over the text containing the user name, a tool tip appears. The tool tip displays the name, email address, and profile picture of the user.
Below the step’s name are displayed the names of the approvers.
Under the Approval initiated step, you see the source system from which the task originates.
Expand the Current workflow step to see the details: the name of the current workflow step, current approver(s), and the reason are going to be visible.
Expand the Workflow history to see a table with the step, action, comment, date (which can be sorted chronologically), and the user name (plus a tool tip with the email address which can be copied to the clipboard).
Notes and comments Module
The number of comments appears between the brackets in the Notes and Comments heading and is visible on the module's icon if you decide to hide it.
You can enter your comment in the Add comment field. A comment can be a maximum of 501 characters long.
Document Viewer Module
In the document module you can see the document that needs to be approved.
The number of documents is displayed on the header of the module, and there are two ways to navigate through documents:
-
By clicking on the arrows Page up or Page down;
-
By using the vertical scroll bar.
In the toolbar below the headline you can see the number of the pages inside the document, and you have the possibility to zoom out and zoom in, download, rotate, and print the document. The document rotates 90 degrees each time you click the Rotate right icon. If you want to print the document, a new tab with the document in print preview is opened.
External Editor (Accounting grid) module
The External editor (or Accounting grid) module is displayed at the bottom of the screen for smaller resolution (1440 - 800 px; 1680 - 480 px (two columns view) and 1280 - 640 px (one column view), below all the modules (Workflow details, Notes and comments, Document details and Document module).
The External editor module has a resize mechanism, allowing you to resize it from full width placed at the bottom of the screen to half width placed on the left bottom of the screen.
Once you make an active choice between “bottom” and “left-bottom”, the layout is saved when using the arrows to navigate to the next task and when logging in via the same browser, after closing down the application. It is not saved when choosing another browser and it is not saved when opening a new task from My tasks.
For higher resolutions (1920 - 725 px), you see a three columns view with the External editor module placed at the left bottom of the screen, under the three modules (Workflow details, Notes and comments, Document details), having the Document viewer module on the right side.
You can resize the External editor or the Accounting grid module to have full width and placed at the bottom of the screen. The layout will be saved only when using the arrows to navigate to the next task and logging back into the same browser.
News in previous versions
Workflow history
In the coming weeks, you will get access to a new functionality, a part of the project Create an audit trail for the workflow configuration. It is called Workflow History and you can access it via the Workflows screen, either by clicking the Workflow History button (for the history of all workflow configurations), or by clicking the three dots next to a workflow (to see the history of just that workflow configuration). This new functionality contains a history of all the changes done to the available workflow configurations, grouped per document type.
This is how to use it:
When opening the Workflow history, inside the table, you can view all the document types or select between the available document types (like invoices, expense claims, leave requests and timesheets). You will then see the date and time, action (created, updated, deleted), workflow name, an optional comment, status of the workflow (active or inactive), and the name of the user.
See Workflows
(To enhance the look and feel of Visma.net Approval, starting with the following weeks, you will utilise a new and improved Configuration Workflow screen that will be followed-up by a history of workflow changes.
What's different about it?
Keeping its trusted functionality, the only thing that is going to be new is the design of the Workflows' screen. It is a visual change that will improve the display of the list of the workflow configuration under types of documents. You will see new icons for when workflows configuration are ON/OFF. The ON icon will be highlighted, notifying you that a specific workflow is active for each document type.
New icons are added also for editing the workflow configuration and the actions "duplicate" and "delete" are going to be grouped under a new icon as well.
You will also have a new button for creating a new workflow configuration.
More information about the workflow configuration: Workflows
During the coming weeks you will get access to our new Workflow panel.
This new Workflow panel will replace the old workflow graph that you could access via a separate tab. The new Workflow panel does not only contain an updated look and feel of the visual representation of the approval process, but also contains new functionality. Besides a visual representation of the steps in the approval process for the document, you can now also see clear information about the approver(s) that currently have the document for approval. At the bottom of the panel, you will find the Workflow history, where you can see exactly what actions have been taken by which user during the approval process.
You can read more about this new panel here: Task details
At the same time, we are introducing some additional features.
In My tasks, you can now see why a task is assigned to you when it is not a normal assignment. You can see if a task was assigned to you because you are a substitute, and/or because it was forwarded to you, you are requested to review, or it was reassigned from another approver by the system administrator. Hold your mouse over an icon to see a description of the meaning.
Read more about My tasks here: My tasks
In the Task details, you can now see why you are asked to approve a document again if you have already acted on it before. The reason why you receive the same document for approval again is now displayed in a tool tip. To access this information, open the task. If you see an information icon next to the Approve button, then you have seen this document before. The tool tip of this icon shows the reason you have received the document for approval again.
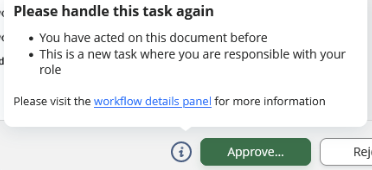
More information about this feature: Task details.
To increase the accessibility of Visma.net Approval, you will notice some changes to the design in the upcoming period. For example, we will increase contrasts, improve navigation and add icons on, for example, due dates.
Besides these visual changes, we will improve the labels and descriptions, improve sequences for text readers and do many other changes to improve the accessibility of our service. The improvements will be released continuously.
In the coming weeks we are rolling out a new feature in My tasks. My tasks will now immediately show any changes to the tasks assigned to you. You can notice the following two changes:
1. When a new task is assigned to you whilst you have My tasks open, you will immediately see this new task. It will be highlighted for 5 seconds.
2. If a task assigned to you is removed, for example, because it was handled by another approver, or it was cancelled by the requester, then the task will show as disabled. You can no longer open the task from your task list and you will be informed that you no longer need to handle the task. The document will still be available in My history.
With this change, we bring real-time updates to My tasks and prevent you from looking into a task that you no longer need to act on.
A new version of Visma.net Approval will soon be released, where the service has gotten a full design makeover. This is purely a design change, meaning that you will not see any difference in the functionalities of the service. Also, all functionalities will still be found in the same places as before.The main change you will see is a new colour scheme and an update in the icons.
Visma.net ERP and Visma.net Approval now offer the possibility to find approvers for your documents based on the branch the document is registered on. The branches you create in the Branches window in Visma.net ERP will now appear in the Assign approvers table in the Cost units window in Visma.net Approval. Here, you can assign different approvers per branch for each cost unit combination. Existing cost unit combinations are still working as before as they will automatically be assigned to "any branch".
Please note that the branches functionality in Visma.net Approval is only available if you have created at least one branch in Visma.net ERP. For users not using branches, nothing will change and the Assign approvers window will look as before.
During 2022, we expect to add branches as an option to find approvers for the other workflow rules as well (list of approvers, department manager, project unit role, etc).
Read more about Cost units, About Workflows, and Editing the document.
There was an issue that was preventing receiving of invoices with emoticons in their description
This has now been resolved and the emoticon is removed when it is received in Visma.net Approval.
Based on the feedback received from users, it is now possible to consider a document fully approved even if only the initial approver has approved it. This change applies to invoices received from Visma.net ERP, where an initial approver is set on the document and/or line level.
You still need to set up a workflow configuration. If you always wish to use initial approvers only, you can create a workflow configuration with a single step where the setting "Block the document when no approvers are found" is not activated. You can then, for example, add a rule based on a list of approvers, add an approver, and add an amount limit that will not be triggered.
Read more about setting up a workflow configuration here: Set up workflows
Setting substitutes for users using the Danish language
Earlier, a bug was preventing the users using the Danish language from setting substitutes for year 2021.
This has now been resolved.
My History is now available in Visma Manager
You now have access on your mobile phone to the list of all approval history of your tasks across all companies you have access to via the Visma Manager app.
With a mobile, friendly user interface, the history list is a shared view for both active and completed processes. This view gives you the possibility to search for a document using a "free text" search in the description, amount, and supplier or requester of the document you are looking for.
From this view you also have access to the details of a selected process.
New design of document data
Within the next two weeks, all users will have access to the new design of the document data. The document data has been moved into the Comments panel, so both pieces of information are available simultaneously. The panel is available within all tabs in the open task or process. The information presented remains the same, but is presented in a more modern way.
Read more in Task details and Editing the document.
Memory and performance issue
An incorrect SQL request caused an increase of the memory usage. This resulted in some degraded performance when loading a list for users with a large amounts of rows, that had payment pre-approval permissions.
This is now fixed and the service is working as expected.
Issue calculating the number of approvers when initial approver is set
We have fixed an issue related to the 4-eyes approval.
When the workflow was solved on document lines and an initial approver was set in the ERP system, the initial approver was ignored when calculating the number of approvers.
This is now fixed and the fallback step is not triggered when the initial approver and the line approver have approved.
New file type supported for attachments
In addition to .png and .pdf files, the system now supports .jpg and .jpeg in the Add attachment feature.
Displaying the document ID in
A bug was causing the document ID in My history to not be displayed. This is now resolved.
Improvements to the cost unit exceptions screen
In this version we provide you with a new way of creating and maintaining the exceptions you create for cost unit assignments. The following improvements are done:
- You can sort and search in the table and see the total amount of exceptions
- New exceptions are added with a button so you do not have to scroll to the end of the table
- Invalid data, for example when an employee has left the company, is now shown clearly to make maintenance easier
- The screen no longer gives errors when an employee, role or approver no longer exists
- The screen loads faster
- If no exceptions exist, you will see information on how to get started
- Several visual improvements
We wish to thank all users that have provided feedback.
Read more about Cost units and Define exceptions.
Resolved verification error in the two-factor authentication window
When approving payments for invoices, clicking the "Pay" button on a batch could result in a verification error in the two-factor authentication window. This was caused by not completing a batch immediately, a refresh of the page or by working in different tabs. We have now resolved the issue.
Show full amount of comments
If a document was previously commented on and then either rejected or cancelled before being resubmitted for approval, we would only show the amount of comments from the current approval request. This means that even though comments from before the document was rejected or cancelled were shown in the Comments panel, they were not counted. This is now solved and the counter of the amount of comments is now showing the correct amount.
4-eyes approval is now available
We have now released a new feature for the 4-eyes approval principle including a fallback step. When you enable this feature, it will enforce that more than one person must approve the document. If at the end of the approval workflow only one person has seen the document or a line within the document, then the document or line(s) will be sent for approval to a list of users defined in a fallback step.
This setting is inactive by default and can be activated in the workflow configuration. This is also where you define the fallback approvers. Read more about this in Set up workflows.
Bug fixes
We have resolved a problem where approving multiple tasks could result into an error and the documents not being approved. This bug could also cause an incorrect approval status when using Approve and pay. Now, you can select many tasks and approve them in one go without this problem.
4-eyes approval is now available
We have now released a new feature for the 4-eyes approval principle including a fallback step. When you enable this feature, it will enforce that more than one person must approve the document. If at the end of the approval workflow only one person has seen the document or a line within the document, then the document or line(s) will be sent for approval to a list of users defined in a fallback step.
This setting is inactive by default and can be activated in the workflow configuration. This is also where you define the fallback approvers. Read more about this in Set up workflows.
Bug fixes
We have solved a problem for users using the Safari web browser on a Mac that were unable to close the Comments panel.
Keep new Comments panel opened
Based on your feedback, we have done an adjustment to the new Comments panel. It will now open by default and it will remember whether it was last opened or closed during your session. We have also done a small adjustment to the colour of the comments to increase their visibility.
New Comments panel
You can now access the Comments from all tabs within a task or process. You can hide or show the comments panel by clicking the Comments header. In the header you will see the amount of comments on the document.
We have improved the comments section within tasks and processes. Now you can access the comments regardless of the tab you are in (including the Document editor if supported), and the Comments panel will remain open when you navigate across different tabs or tasks/processes. The comments also have had a visual make-over and now support profile images uploaded in the user details.
Release notes and online help
We will now notify you of important changes to our service by showing a notification in Help Centre. Also, we have updated the Online help and Getting started information.