Visma.net ERP
About the hierarchy of item classes
In Visma.net ERP, item classes are used to group stock or non-stock items with similar properties and to
provide default settings for new items.
In the Item classes (IN201000)
window, you can create item classes for stock items as well as for non-stock items of each
type that is used in your business.
The item class is a required parameter
of
a stock item;
the
item class includes the settings that are used for availability
calculation, replenishment, price management, and posting to the general ledger.
A user specifies an item class when they define a new stock or non-stock item in the Stock items (IN202500) or Non-stock items (IN202000) window respectively, and the system fills in many values, thus saving users time and increasing the accuracy of the entered data.
You can also use item classes
for
categorising items.
If do this, you can set the hierarchy of the item
classes directly in the item class IDs.
The sections below describe the specifics of
configuring item classes and using them for categorising stock items.
The structure of item class IDs is defined by the INITEMCLASS segmented key, which
you can review and modify in the Segment keys (CS202000) window.
This
segmented key has a hierarchical structure—that is, each segment of the segmented key
defines
the hierarchical level.
You can review the item class hierarchy in the Item class
tree pane in the Item classes (IN201000) window.
In this
pane, each item class is represented as a tree node if it has child item classes, or as a
leaf of a tree if it has no child item classes.
After you have defined the structure of the INITEMCLASS segmented key, the system
shows the mask that corresponds to this structure in any field that requires the user to enter
an item class ID.
The characters in the mask that aren't yet specified are denoted with
*; the segments are divided with the separator character specified in the
Delimiter column in the Segment keys (CS202000) window for
INITEMCLASS (- by default).
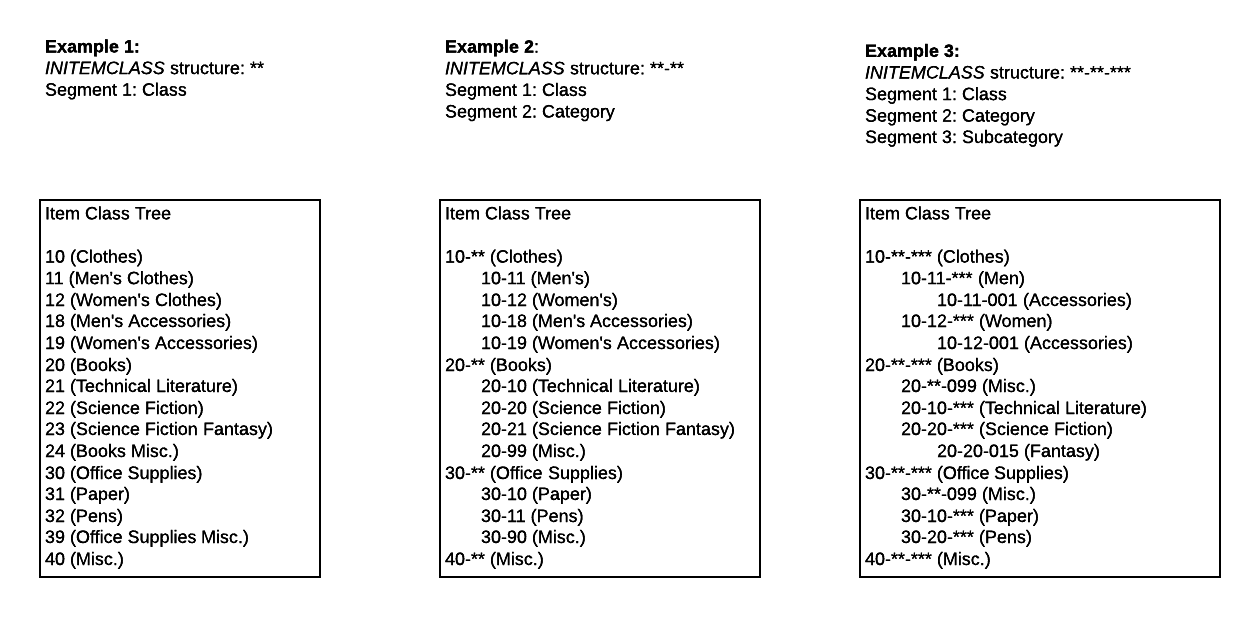
For example: If you have specified three
segments of two symbols each, the mask shown in a field where an item class ID must be entered
will be **-**-**.
If the INITEMCLASS segmented key has one segment, the item classes will have a
plain
structure with no nested levels (see Example 1 on the diagram below).
If you are going to
use a plain structure of the item classes, you have to specify a sufficient length of the
only segment so you can specify as many classes as you need.
If you specify two or more segments in the INITEMCLASS segmented key, each segment
after the first segment defines a subsequent level of hierarchy.
Item classes that have the
second segment specified are displayed at the second level of hierarchy.
An item class
segment of the second level
directly
refers to the parent item class segment of the first level.
That is,
under different parent item classes, you can create child item classes with the
same
ID of the second segment but different settings; see 20-10 (Technical
literature) and 30-10 (Paper) in Example 2 on the diagram below.
By adding more segments to the segmented key, you can expand your ability to categorise
items by item classes.
For instance, you could add a third level (see the hierarchy in
Example 3 on the diagram below) to make your inventory categorisation even more
comprehensive and flexible.
By using the INITEMCLASS segmented key, you can specify
as many levels as you need.
You can append a new segment to the key at any time; however, we
recommend that you carefully plan the structure of the segmented key before you start to
create and use item classes.
When you create an item class (stock or non-stock) that is the child of any other item
class, the system suggests the default settings of the parent class.
For the classes at the
first level of the item class hierarchy, which have no parent classes that could provide
default settings, you can specify the default item classes in the Inventory preferences (IN101000) window as follows:
- In the Default stock item class field, you can select the stock item class whose settings will be used by default for newly created stock item classes.
- In the Default non-stock item class field, you can select the non-stock item class whose settings will be used by default for newly created non-stock item classes.
When you create a new item class or enter an item class ID in any appropriate field in the
system, you have to specify the needed symbols according to the mask of the
INITEMCLASS segmented key. If you skip any of the characters in any segment, the
system shows * instead of a blank symbol.
When you enter an item class ID, you can either
enter each segment value manually, or press F3 and select the segment value from the list.
For the first segment, only the segment values of the first level of hierarchy are displayed
in the selection field.
For each subsequent segment, in the selection list, the system shows
the child segment values that are appropriate based on the previous segment or segments
selected.
Suppose that you have changed some settings of a parent item class.
When you changed these
settings, they will apply to all newly created item classes of this parent item class, but
these changes do not influence the settings of the existing child item classes of this
parent item class.
So if you need to have these changed settings reflected in all child item
classes, you need to update them as well.
To simplify the process of updating multiple child item classes, you can automatically
apply the settings of the parent item class to all its child item classes.
To do this, while
viewing the parent class in the Item classes (IN201000) window, you
click Actions - Apply to children in the window toolbar.
After you confirm the action, the system updates all the
settings of the children of this item class on all levels of the hierarchy, so that
all
item classes of this tree node have identical settings.
You can delete only those item classes to which no stock items have been assigned yet.
To delete an item class, you open the class in the Item classes (IN201000) window and click Delete in the window toolbar.
When you
delete a parent item class, the system asks whether you want to keep the child item classes
of this parent.
The system proceeds as follows based on your response:
- If you click Yes in the message field, the system deletes the
parent item class and keeps all its the children in the hierarchy.
The children item classes becomes the children of the item class at the level immediately above the deleted item class. - If you click No in the message field, the system deletes the entire tree node of the item class hierarchy (that is, the parent item class along with all of its children item classes).
A change of one segment or multiple segments in an item class ID may influence the position
of the item class in the tree.
To change an item class ID, click Actions - Change ID in the window toolbar of the Item classes (IN201000) window.
When you confirm the action, the
item class ID changes, and the system rebuilds the item class hierarchy.
You can review the stock items that belong to a particular item class in the Stock items by item class (IN408000) window.
The left pane of this window shows the tree of
item classes.
When you click an item class in the tree, the right pane of the window shows the
stock items that belong to this class.
The Show items option button specified on the right pane determines
which stock items are listed: By default, the Related to only the current
item class option button is selected, which means that the table displays only
the items that belong to the selected item class.
To make the system show the stock items that belong to the selected item class, along with stock items that belong to all
child item classes of the selected item class, select the Related to the current
and child item classes option button.
Also, in the Stock items by item class (IN408000) window, you can quickly review to which item
class a particular item belongs and which other stock items belong to this class.
To do
this, select the particular stock item by its ID in the Item ID field.
Once you do, the system selects the item class to which the item
belongs in the tree of item classes and shows all stock items of this class in the
table.
For a single stock or non-stock stock item, you can change the item class in the item's settings in the Stock items (IN202500) window and Non-stock items (IN202000) window, respectively.
If you need to move multiple stock items to another item class at a time, you can use
the cut and paste functionality in the Stock items by item class (IN408000) window.
To do this, in this window, click the item class to which the needed items currently belong in
the Item class tree, select the unlabelled check boxes in the rows
with the needed stock items in the table on the right pane, and click the Cut
selected records button on the table toolbar of the right pane. The system
copies the selected rows to the clipboard.
Then, in the Item class
tree, click the destination item class (the class into which you want to move
the selected items), and on the table toolbar of the right pane, click the Paste
records button.
The system asks whether you want to keep the settings of the
moved items:
- If you click Yes in the message field, the system updates the settings of the moved items to the settings of the destination item class.
- If you click No in the message field, the system keeps the settings of the moved items unchanged.