Visma eAccounting Standaard
Switch from another accounting software to Visma eAccounting
Visma eAccounting Standaard allows you to manage your billing and accounting online. Work on the device you want - desktop, tablet or smartphone - the choice is yours.
To make the switch as smooth as possible, you can transfer data from your old software to Visma eAccounting Standaard. This is easily done with the migration guide. Select the program you have switched from below for information on how to proceed.
Switching from another Visma software
If you change to Visma eAccounting Standaard having previously worked in another accounting software from Visma use the link below to get more information on how to proceed with the change of accounting software.

|
How to switch from another Visma software |
Importing data files and entering opening balances
If you previously have worked with any other accounting software, the information below about how to transfer data will help you getting started with Visma eAccounting Standaard.
By importing data files, you can easily transfer information from your previous accounting software to Visma eAccounting Standaard. You can import CSV-files.
CSV-files can be used for importing articles, customers, suppliers and the chart of accounts. It is not possible to import accounting transactions or unpaid invoices using CSV-files. Therefore you must not forget to enter your opening balance in Visma eAccounting Standaard when you use CSV-files for transferring data from your previous software program.
More information about the different options can be found in Import and export.
The first time you create a new financial year in Visma eAccounting Standaard, you can enter opening balances for your company.
- Select Settings.
- Select Financial years and OB and click on Edit.
- Enter the opening balances.
The general rule for all accounts is that the closing balance from the preceding year must be entered as the opening balance of the same accounts for the new year. In case you begin working with Visma eAccounting Standaard for the first time, the closing balance from your previous accounting software determines the opening balance in Visma eAccounting Standaard.
The procedure for the balance in accounts payable and accounts receivable is different from entering opening balances for other ledger accounts. Separate accounts are used for the invoices from the previous accounting software and new invoices created in Visma eAccounting Standaard, so that they can be distinguished.
The default chart of accounts of Visma eAccounting Standaard uses account 1200 for accounts receivable and account 1500 for accounts payable. Use accounts 1205 and 1505 for registering the opening balances from the previous accounting software.
The balance in 1200 will consist of customer invoices that are created and monitored in Visma eAccounting Standaard. The balance in 1205 on the other hand consists of customer invoices created in another accounting program. Similarly, the balance in 1500 will consist of purchase invoices registered and followed up in Visma eAccounting Standaard. The balance in accounts 1505 on the other hand consists of purchase invoices registered in another accounting program.
Please note: It is possible to use different account numbers than accounts 1205 and 1505, for example when your accountant suggests otherwise. In that case you can still use the procedure below, you only have to replace accounts 1205 and 1505 by the accounts of your choice.
In case accounts 1205 and 1505 are not yet present in your chart of accounts in Visma eAccounting Standaard, these can be added as follows.
- Select Settings.
- Select Chart of accounts.
- Select New ledger account.
- Enter the following information:
- Account no: 1205
- Name: Accounts receivable - old
- VAT code: No VAT code
- Type: Accounts receivable
- Remove the checkmark from the boxes for allowing cost centres and projects.
- Select Save.
- Select New ledger account.
- Enter the following information:
- Account no: 1505
- Name: Accounts payable - old
- VAT code: No VAT code
- Type: Accounts payable
- Remove the checkmark from the boxes for allowing cost centres and projects.
- Select Save.
After you have created the ledger accounts, you can register the balances from the previous accounting software in the opening balance.
- Select Settings.
- Select Financial years and OB.
- Select Opening balance.
- Enter the opening balance for the accounts receivable and accounts payable in accounts 1205 and 1505.
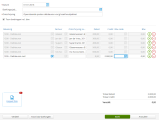
Normally, you enter a debit amount for the balance in 1205, and a credit amount for 1505. You therefore enter the amount for the balance in 1505 including a minus sign, like in the example below:

When reconciling payments of invoices from the previous accounting software in Visma eAccounting Standaard, you use accounts 1205 and 1505 instead of 1200 and 1500, respectively. By doing so, the balance in accounts 1205 and 1505 will become 0, once the invoices from the previous software have fully been paid/processed.
Instead of reconciling the ledger accounts 1205 and 1505 manually as described above, it is also possible to transfer the balance in these accounts to accounts 1200 and 1500, respectively. This gives you the benefit of having the unpaid invoices from your previous accounting software included in the list of unpaid invoices created in Visma eAccounting Standaard. This way you can easily track which invoices are paid, and which ones are not.
By using the Manual payable/receivable item function, you can easily enter your unpaid invoices from the previous software program in eAccounting, and transfer the balance from accounts 1205 and 1505 to 1200 and 1500 at the same time.
Now you enter your unpaid invoices as follows:
- Select Accounting.
- Select Journal entries.
- Select New journal entry.
- In the Date field enter the first day you started working in Visma eAccounting Standaard.
- Enter a Description.
- Select account 1200.
- Click the list arrow at Customer/Supplier and select New receivable item or New payable item.
- Enter the invoice details.
For unpaid invoices from previous financial years, select the 1st of January in the financial year of which you start as both the invoice and due date. If you enter an invoice or due date from a previous financial year, the program will create this financial year and thereby remove the opening balance of the current financial year. This action cannot be undone.
- Repeat these steps until you have registered all the unpaid sales invoices. Add new rows by using the plus icon.
- Select Post to ledger.
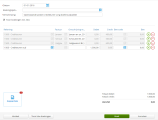
Select account 1205 in the last row of the journal entry and then enter the total amount that you previously entered for account 1205 in the journal entry. This amount has to match the amount of account 1200 exactly to balance the journal entry.
Enter your unpaid purchase invoices in a similar way to account 1500 and thus debit the balance to account 1505. See the screenshot below for an illustration:

